Category: Free Inquiry

This is the category to apply to your Free Inquiry posts.

Understanding the Social, Cultural, and Oppressive Aspects of Bread

Source: ohnmarwin.com

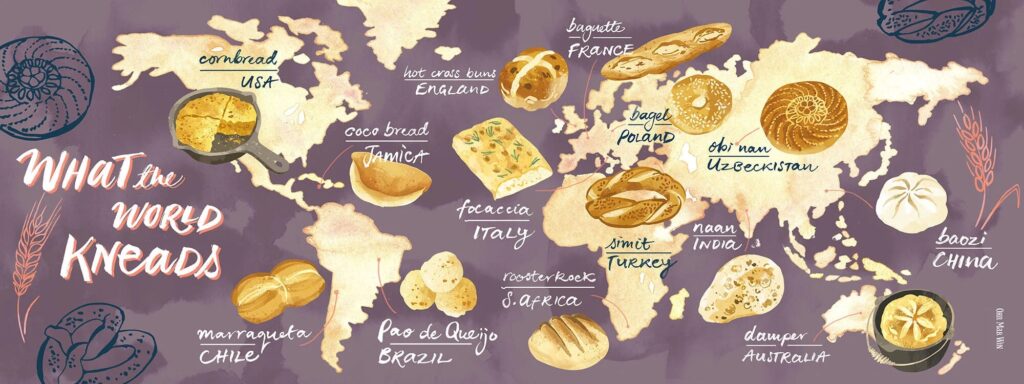
By connecting everyday food to Social Studies, students can explore historical, cultural, and shared values across the world. From the grains that helped shape ancient civilizations to the artistry that transformed the loaf, bread making can foster curiosity and cross-curricular thinking.

From the BC Curriculum:

  • Core Competency:
    • Personal and Social Responsibility: Understanding food sources, sustainability, and cultural respect.
  • Social Studies:
    • Big Idea: Canada’s policies and treatment of minority peoples have negative and positive legacies.
    • Curricular Competencies:
      • Use inquiry to understand historical and cultural perspectives on food
      • Sequence objects, images, and events, and recognize the positive and negative aspects of continuities and changes in the past and present
      • Evaluate and explain the significance of grain resources in shaping communities and trade.

During my research, I wanted to explore a popular bread type that has been connected to many Indigenous cultures and communities within Canada: Bannock. To my surprise, bannock’s roots actually originate from Scotland, and was introduced to Indigenous peoples by colonizers during the 18th and 19th centuries.

Source: Alaska Ethnobotony Circa 1900, Saskatchewan

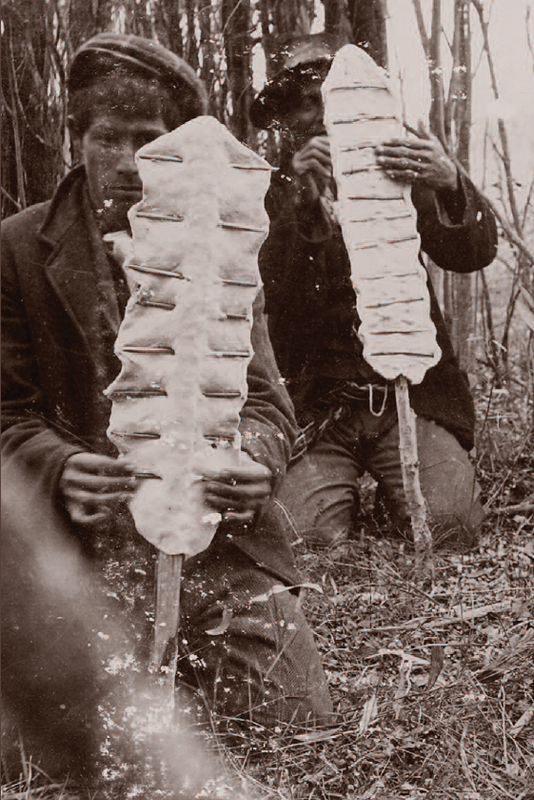
When Indigenous peoples were forced off of their native lands and on to reservations, they lost many vital food sources they had relied on for thousands of years. Those living on reservations were supplied with food rations, many of which were completely foreign to them. Due to this, bannock was made in order to avoid starvation.

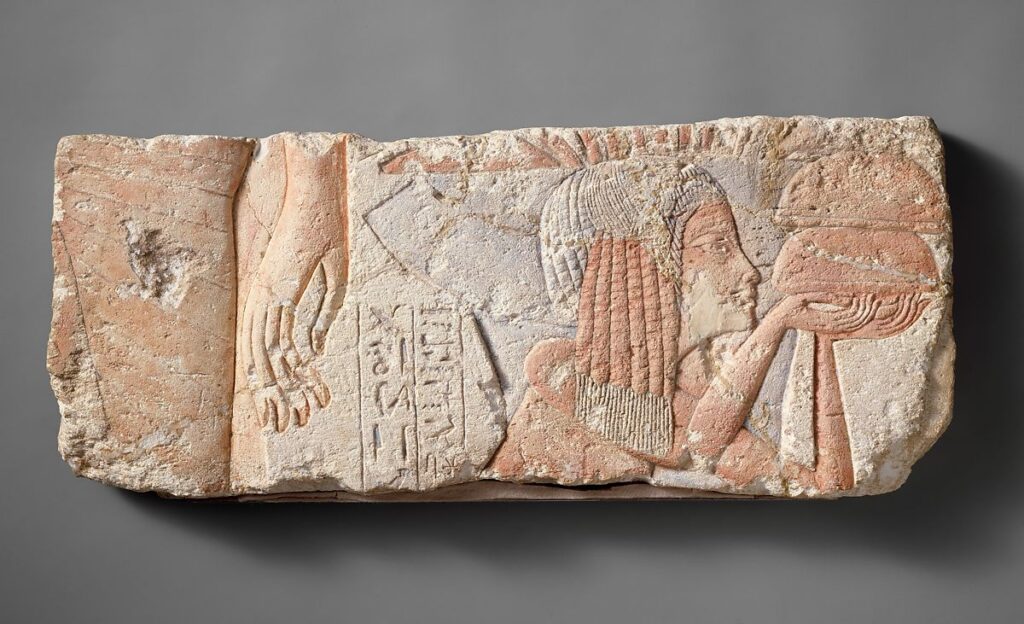
Bannock was not the first bread to be eaten by Indigenous peoples of North America. Before bannock, some nations created flatbreads similar to tortillas from the starch and flour of bracken rhizomes (underground stems of ferns). Today, many Indigenous cultural events such as powwows, feasts, and community gatherings will have bannock. Indigenous-owned restaurants will often feature this bread on their menus. Its ties to colonization but modern applications make it a tricky subject, but one that is worth exploring with your students. For some Indigenous people, the making of Bannock can be empowering, as it represents resilience and survival.

“Bannock was what we had to eat, but now I want to pay homage to the dignity of our women who have learned to turn a negative into a positive” – Emilee Gilpin

Bread Making in the Classroom: Focusing on the Math and the Science

Source: boredteachers.com

My bread-making journey over the past two months has given me plenty of time to reflect and make connections to how bread can be applied to a variety of curricular content and competencies in the classroom:

From the BC Curriculum:

  • Core Competencies:
    • Communication: students will work together in groups to gather ingredients, mix, knead, fold, and bake their bread. They will reflect on their shared experience afterwards.
    • Critical and Creative Thinking: Experimenting with ingredients, solving problems during the process.
    • Personal and Social Responsibility: Understanding food sources, sustainability, and cultural respect.
  • Science (Grade 4)
    • Big Idea: Matter has mass, takes up space, and can change when it is heated or cooled.
    • Curricular Competencies: predict outcomes based on prior knowledge, collect data based off of observations, compare results to predictions, and communicate findings using data tables, charts, reflections, and drawings.
  • Math (Grade 4)
    • Big Idea: Fractions and decimals are types of numbers that can represent quantities.
    • Curricular Competencies:
      • Model mathematics in contextualized experiences
      • Develop, demonstrate, and apply mathematical understanding through play, inquiry, and problem solving
      • Use mathematical vocabulary and language to contribute to mathematical discussions

Bread making as a class project can be incorporated to build off of prior knowledge and to cement learning in an engaging and hands-on way. Learning about the science behind the process of bread making can help students develop a newfound fascination with everyday items, and how energy sources like heat can change matter. My hope is that experiences like this encourage them to formulate more I wonder statements about the world we live in.

Here is a great introductory video on Why Bread Has Holes in it.

While making bread, students will practice their ability to measure and apply their mathematical thinking, specifically their understanding of fractions and ratios. When looking at a recipe, we may want to double it or reduce the quantities by half. This can be a great way to have students practice their mental math with fractions in an interactive way. You can also have students practice weighing their ingredients, which can help show students how different substances have different masses, even if they have the same volume!

The wonderful thing about bread is you can scale the complexity depending on the age level you are working with. Here is a simple white bread recipe that can be used with a bread machine. For older grades, you can use recipes that require multiple rises, proofing, and different flour compositions. This can be useful for analyzing cause and effect. For example, students could decide what variable they would like to measure by baking two loaves. One loaf would follow the recipe exactly, and the other, for example, might omit the proofing stage. What happens?

For my next blog post, I will continue to explore the incorporation of bread making in the classroom, but with a focus on Social Studies and Art.

Hands-on Learning: My First Loaf of Sourdough

Making sourdough is just as much of an art as it is science. During my search to find a recipe, I discovered that there are many different methods. While all are very similar in their timeline and methodology, each baker adds their own unique touch. Whether it is folding, hydration content, or the type of flour used, every sourdough loaf is the result of both creativity and experimentation.

I was given a sourdough recipe by a colleague of mine who is also in the EKTEP program. I began by removing my starter from the fridge on Sunday morning to ‘wake up’ and feed. Placing sourdough in the fridge is useful for those who do not bake on a daily basis. When I first started feeding my starter, I had it out on the counter and was feeding/discarding every day. I began to notice just how much was being wasted (discard is a necessary evil of sourdough starter) and began looking for alternative storage options that better suited my busy schedule. Storing your starter in the fridge significantly slows the fermentation process, which allows you to reduce feeding to a weekly basis instead of daily. This has also been shown to give the bread a more complex flavour!

After removing the starter from the fridge to ‘wake up’ (warmer temperatures affect rate of fermentation), I fed it fresh flour and warm water. I found the most challenging aspect of bread-making to be time management. For example, after feeding your starter for making bread, you must wait 4-7 hours for it to double in size. Then you combine more flour, salt, and water and must let it rest for another 2-3 hours! The bubbles seen in your starter is where the magic happens- these are pockets of gases produced by the fermentation, giving sourdough its notable flavour.

Stretching and Folding

Source: Theclevercarrot.com

The recipe I used called to stretch and fold the dough every 30 minutes for the next two hours after the first rise. Stretching and folding the dough is done to strengthen the dough and give it an airy texture. If you read my previous blog post on the science of bread making, you’ll remember that this is similar to the act of kneading the dough, as it helps straighten out proteins in order for them to interact with each other better.

Cookware

In order to get a golden flaky crust, you need to bake your sourdough in a dutch oven. This is because the lid traps the steam, allowing the loaf to bake thoroughly and evenly. Dutch ovens are also preferred for bread making, as they can withstand high temperatures.

I was gifted a set of enamelled dutch oven pots that are sold at Costco. They are super easy to clean and a beautiful colour!

Learning through doing: My takeaways

Learning happens outside of your comfort zone

I am susceptible to paralysis through analysis, meaning I find it difficult to start a project if I do not feel completely confident in what I am doing. Starting my first loaf of sourdough was intimidating for this very reason! But, I knew that the only way I could determine my skill set and areas needed in growth was to start. This makes me think about instances of timid trepidation with elementary students in the classroom. When students do not have the confidence and the sense of security to feel safe to fail at something, they may avoid going outside of their comfort zone. That is why it is so important to show students it is okay to make mistakes (and that you do too).

Patience is a virtue

Making a loaf of sourdough involves a lot of waiting. I ended up doing a cold ferment for my final rise (a 8-10 hour rise in the fridge), bringing my total time from start to finish to be just under 24 hours. I opted for the cold ferment because otherwise I would be up well past midnight of the first day. This ended up working well in my favour, as cold ferments also influence the complexity of your bread’s flavour. A win-win: I get to sleep, and I have delicious bread to look forward to! I think projects like bread making can be useful for getting students used to delayed gratification. In fact, studies have shown that children who are more used to a delay in gratification (as opposed to immediate rewards) tended to be more successful in life. This is because they developed higher levels of persistence and self-control; traits that are essential for overcoming challenge and adversity.

Unconsciously Expanding your Knowledge

I think learning is the most fun when you don’t even know that you’re learning. An experiment conducted at Harvard University asked students to report in what contexts they feel like they learn the most: lecture-style methods or activity-based approaches. Most students reported that they felt they learned more in traditional lecture settings. Interestingly enough when tested, students in the activity-based approach did far better, suggesting that they learned and retained more information even if they did not realize it. The researchers theorized that students may feel like they learn more in a lecture as there is less effort on their end. Hands-on approaches require more cognitive effort, which may force students to leave comfortability.

Breaking Bread: Exploring the Chemistry that Makes Your Bread Rise

The ingredients behind a fluffy loaf of bread are simple: flour, water, yeast, and sugar. But with a closer look, we see that there is more to these ingredients than initially meets the eye. If you have made bread before, you know that when these four ingredients are combined, the dough doubles in size. This reaction has always fascinated me, which made me wonder what was going on at a molecular level.

The Flour

There are many different types of flour. What makes each of them unique is their protein content. Bread flours will have a higher protein percentage, ranging around 12-14%, whereas all-purpose flours tend to be in the 10-11% range. So what does this mean, exactly? The more protein there is, the higher the rise. It will also add to the texture of the final product, making it more chewy. These proteins, specifically glutenins and gliadins, are what create gluten.

Source: Kansas Wheat Commission

Adding Water

When we add water to our flour, the gliadin and glutenin proteins line up with one another to create stronger bonds and a larger network of gluten. I found the below video helped me to understand this process visually. When we knead the dough, it helps straighten out these proteins in order for them to interact with each other better.

Yeast: What is it?

The word yeast comes from old-English, where the root ‘yes’ means “to boil” or “rise”. Yeast is a single-celled fungus that has been on Earth for hundreds of millions of years. Depending on the type (there are currently more than 1500 types of yeast identified today), yeast can create alcohol by converting carbohydrates and CO2 when left to ferment (sugar is partially responsible for this process). Yeast in bread dough converts the sugars into CO2, giving us air pockets in fluffy bread.

Before commercial yeast was introduced, bakers would obtain this culture from the town’s brewer, who would scrape off the ‘barm’ for the baker to use as a leavening agent in their breads. This barm was essentially a foamy yeast substance that would float to the top of their batch of beer during the fermentation process. There are also a wide variety of wild yeasts in the air we breathe, which is how sourdough starter works!

Into the Oven

Once you have allowed ample time for the yeast to ferment and the dough to rise, it is time to bake your loaf. In the oven, the carbon dioxide and sulphates are cooked off, leaving behind their footprints that give bread its classic airy texture. Through my research, I learned that bread will begin to go stale not due to a loss in moisture, but due to the crystallization of the starch in the bread. This indicates that if you plan to store your bread in the fridge, this will only exacerbate your problem! The best way to mitigate this process is to store homemade bread in a sealable ziplock bag at room temperature. In our house, we don’t have to worry about this too much, as we tend to eat all of it before this happens!

Making Sourdough Bread

For many of us, bread is a major staple food in our everyday diet. From toast at breakfast, the crust of our pizza, to the rolls we share at dinner time, bread is everywhere and universally loved. This passion spans back thousands of years, starting with flatbreads that were cooked in burning embers, to fluffy hearty breads baked in specialized ovens.

I began my inquiry project with a goal to learn more about the world of bread making. Specifically, the art of sourdough starters. As I began my research, I started to notice the fascinating blend of science, history, and culture wrapped up in something as seemingly simple as flour and water. I began my sourdough starter with my digital food scale, thermometer, rye flour, and all purpose flour. During this initital process, I couldn’t help wondering how, without any technology or knowledge about microbiology, did ancient civilizations figure out the complex process of fermentation?

When making sourdough at home today, you will follow a precise step-by-step process of mixing varying levels of Rye flour, unbleached All-Purpose flour, and water heated to exactly 85°F. Your starter will need to be ‘fed’ at least once every 24 hours, meaning some of your mixture must be removed and new flour and water must be added.

I began my journey of homemade sourdough bread by watching Joshua Weismann’s ‘Ultimate Sourdough Starter Guide‘ on Youtube.

I found Joshua’s video very informative and easy to follow, especially for a beginning bread maker like me! He even includes a detailed downloadable PDF that provides specific instructions for beginning your sourdough starter.

After watching the tutorial video a couple hundred times, I was ready to begin my bread-making journey. Pictured here is my digital food scale, a thermometer, a clean glass jar, unbleached All Purpose flour, dark Rye flour, a spatula, and water. Day 1 of my starter feeding calls for the following:

  • 100 g rye flour
  • 150 g water at 85°F

As recommended by Josh in his video, I record the weight of my empty mason jar. This will be needed for later when I routinely remove mature starter and add fresh ingredients. During my recording and careful weighing of the exact amount of flour, I am thinking about how this can be applied to many different areas of the BC Curriculum across multiple different grade levels. Here are a few curricular connections for mathematics that can be made:

  • Mathematics, grade 3: units of measurement (linear, mass, and capacity)
  • Mathematics, grade 6: Ratios, volume and capacity

For my next blog post, I will focus on the rich history of sourdough bread making. Throughout my free inquiry I also intend to provide weekly updates on my own bread-making journey!

Introduction: The Science & History of Bread Making

For this semester’s Free Inquiry project, I will be exploring various virtual resources to learn how to make different types of bread. I’ve made some basic breads in past years, but never have made anything that requires more than a few hours of work. For my Free Inquiry Project, I wanted something I could apply to a personal interest of mine as well as being cross-curricular (science, history, and ADST).

Introduction

I chose bread-making for my project because its history and chemical processes have always fascinated me. In the early stages of my research I have come to discover that bread has played a much more important role in human history and civilization than I had initially thought.

The earliest forms of bread date back more than 14,000 years ago in the country of Jordan, where an ancient stone fireplace was discovered with remnants of bread crumbs. During this time period (and dating back over 100,000 years), people would grind cereal grains and mix it with water to form a paste. It is still unclear how exactly this paste was further prepared, but researchers believe that at some point this paste was turned into the world’s first flatbread (Alfaro, 2020).

Ancient Egypt Alive

Between 14,000 and 10,000 years ago, it is believed that the discovery of yeast was discovered accidentally, likely when someone left out the water-flour substance for enough time to let it ferment and form small gas bubbles. Thus, the world’s first sourdough starter was born.

For my project, I plan to research the history, science, and methodology of bread-making to be able to create my own loaves at home, and eventually in the classroom with my future students. Bread-making is great for many different grade levels, and can be applied to multiple subject areas:

  • Science: Bread-making is great for many different grade levels, as it helps show certain chemical processes, such as the role of yeast in fermentation and the production of CO2.
  • Mathematics: Measurement, ratios, fractions, and percentages.
  • History: A food source that has been a staple for thousands of years in many different countries and civilizations.
  • Geography & Social Studies: Explore how regional differences influence types of bread made within certain cultures.

Through my inquiries, I will be able to explore a cross-curricular project suitable for many different grade levels. To stay organized while researching, writing, baking, and reflecting on my project, I will use a Trello board, which is a free online resource (pictured below) to help you organize your daily and weekly tasks.

Sources

Alfaro, D. (2020, March 11). A definitive timeline of bread. The Spruce Eats.

https://www.thespruceeats.com/bread-history-timeline-4783245 

Egyptian Hieroglyphics photo from https://ancientegyptalive.com/2022/06/01/bread-in-ancient-egypt/

Trello Board https://trello.com/b/ybHRqbFx/edci-336-free-inquiry-project